Store Master | DocumentationTable of Contents |
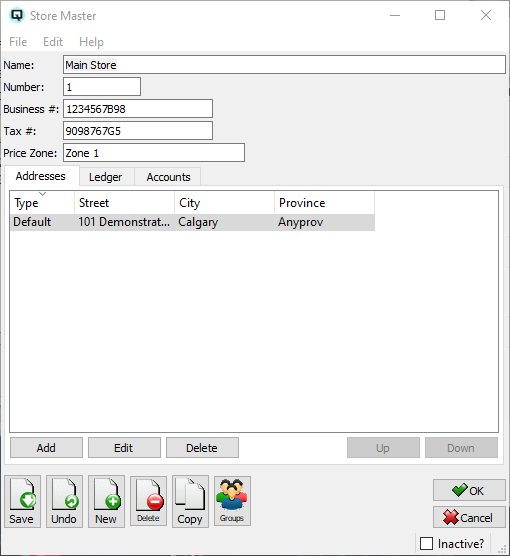
The store master window is used to define or edit information on the physical stores within an organization.
The name given to the store.
The number assigned to the store.
The business number for the store.
The tax number for the store.
The price zone that the store will be linked to. All regular prices are defined by price zone.
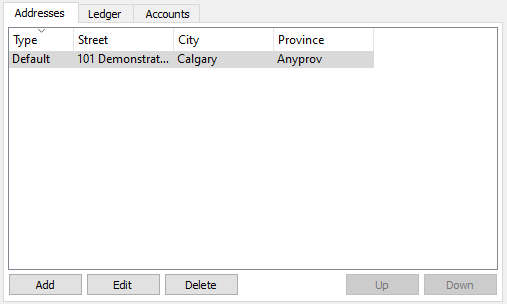
- Add a new store address. When you click on the add button the "Add Address" screen will be displayed.
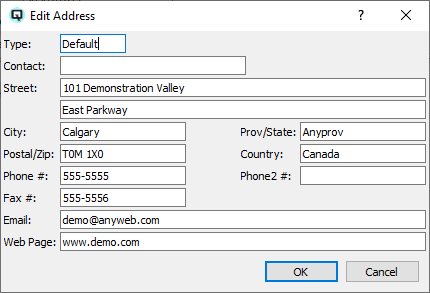
The type of address.
Enter contact name.
The street address of the store.
The city in which the store is located.
The province/state in which the store is located.
The stores postal/zip code.
The country in which the store is located.
The stores primary phone number.
The stores alternate phone number.
The stores fax number.
The stores e-mail address.
The stores Internet URL address.
- Edit an existing store address.
- Delete an existing store address.
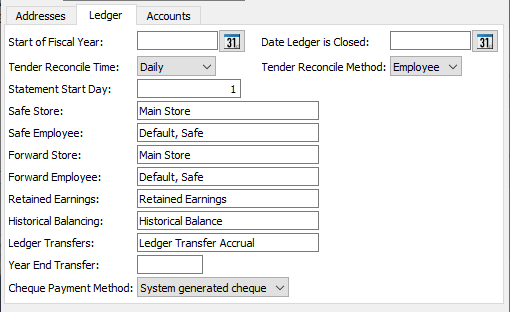
This section is used to define ledger specific information and control information about your store.
Enter the first day of your fiscal accounting year. Quasar requires this date to properly print financial statements.
Enter the closing date for the ledger. Once a date is entered, no transactions affecting the ledger accounts may be posted to any date on or prior to the date entered.
Select daily or periodically.
Select daily if the the cash reconcile will be done daily. This works like a security mechanism forcing you to reconcile each day that there are transactions before you can move on to the next days reconcile.
Select periodically if you will just reconcile on an irregular basis and do not want to be forced to reconcile daily.
- Select Station or Employee.
If "Station" is selected then the cash reconciliation will be balanced by point-of-sale station.
If "Employee" is selected then the cash reconciliation will be balanced by employee/cashier.
Enter the monthly start date for your customer statements.
Enter the store where the money is held in the safe during cash reconciliation.
Enter station/employee that acts as the safe for cash reconciliation purposes.
If you will be transferring un-deposited funds to a station/employee during the cash reconcile process then specify the store.
If you will be transferring un-deposited funds to a station/employee during the cash reconcile process then specify the station/employee.
Link an account to be the retained earnings account. The retained earnings account is a special account that displays the current profit/loss balance in the equity portion of the balance sheet.
Link an account to be the historical balance account. Quasar uses this historical balance for offsetting entries when posting current customer balances, vendor balances and inventory balances.
Define an accrual account for ledger transfers. When a ledger transfer takes place between two stores the balance sheet of each store is impacted. The transfer accrual account is used to offset the in/out postings to the ledger.
When the preliminary year end process is run a journal entry is created that transfers profit and loss balances to the retained earnings account. The journal entry transaction number for that transaction is displayed here.
Select the cheque payment method that will default in the quick cheque, customer cheque, vendor payment and paybills screen.
Cheques are hand written and they will not be queued in the cheque printing screen.
Cheques will be generated from Quasar and will be queued in the cheque printing screen.
Payments are made using the world wide web and as such cheques will not be queued for printing.

This section is used to define default accounts for the store.
Define the default bank account that will be used when creating cheques and paying bills.
Define the default receivable account that will be used when creating new customers.
Define the default payable account that will be used when creating new vendors.
Define the default expense account that will be used when early payment discounts are given to customers.
Define the default terms discount account that will be used to record the income as a result of taking advantage of early payment discounts.
Define a container deposit account. From time to time it is necessary to purchase and sell items that have container deposits. Quasar tracks deposit purchases and deposit sales in the container deposit account.
Define a levy account. In some areas the government requires that you collect levies such as environmental levies. Quasar tracks these levies collected in the environmental levy account.
Define an accrual account for stock transfers. When a stock transfer takes place between two stores the balance sheet of each store is impacted. The transfer accrual account is used to offset the in/out postings to inventory.
Define an account that will hold the income from item transfers between stores when transfers are not done at cost.
Define a default expense account for item adjustments created by physical inventory counts. When an item quantity is adjusted, up or down, there is a increase or reduction of the inventory value. This change in value is offset by posting to an expense account.
Define a default income account for service charges that are charged on past due customer invoices.
Toggle on or off. Toggle off to set the store to inactive. Toggle on to re-set the store to active.