Item Master | DocumentationTable of Contents |

The item master screen is used to create new items. You can define conventional inventoried items, service items, open department items, manufactured kits and expense type items.
The speed in which new items are created can be substantially sped up by first entering sub-departments containing default data. Sub-departments are created in the sub-department master window. Following is a list of all attributes in the item master window:
The lookup id number for the item.
The description of the item.
The department the item is linked to. The department is the highest level of hierarchy for an item.
The item may be linked to a subdepartment. Subdepartments are nested in departments and are the second level of hierarchy for items. When entering a subdepartment in a new item, the subdepartment defaults will be brought forward to populate the corresponding attributes in the item. Utilization of subdepartments can substantially speed up item entry.
The product brand of the item.
Use the main tab to define the item type, item sizes and all numbers such as UPC numbers that link to the item. In addition define flags and quantity levels which are used by the Quasar pricing routines.
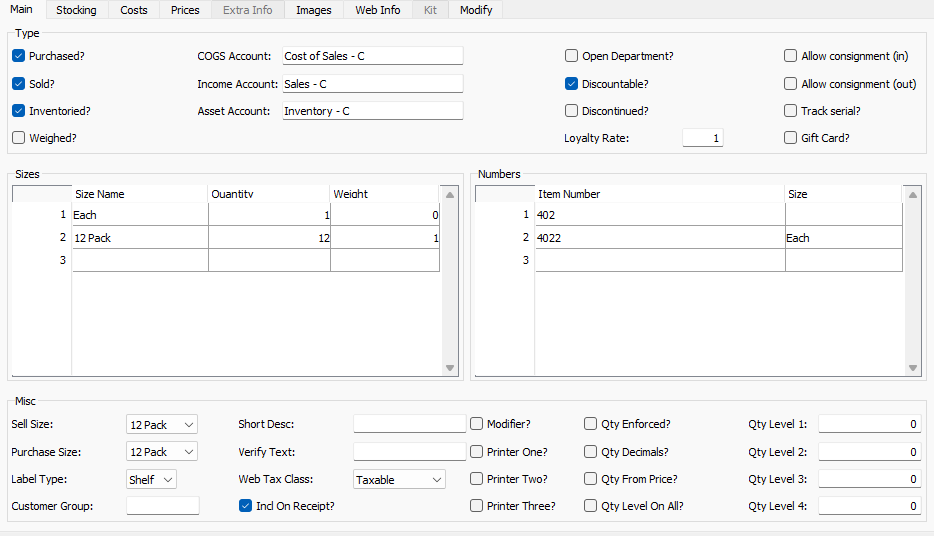
Defines if an item is purchased, sold and inventoried or any combination of the three. The ledger accounts required will be displayed dependent on the combination selected. In addition other important information such as whether or not the item is used in consignments, whether the item requires serial number tracking and if the item is an open department is defined in the type section.

Toggle on or off. Toggle on if the item will be purchased through Quasar's purchasing and receiving functions.
- Toggle on or off. Toggle on if the item will be sold through Quasar's sales functions.
Toggle on or off. Toggle on if the item will be inventoried through Quasar's inventory functions.
Toggle on or off. Toggle on if the item needs to be weighed at the point-of-sale.
Defines the cost of goods sold ledger account where the cost of the item sold will be posted when the item is sold.
- Defines the income ledger account where the income will be posted when an item is sold.
Defines the asset ledger account where the change in the amount of the inventory asset will be posted when an item is purchased, adjusted or sold.
Toggle on or off. Toggle on if the item is an open department. When a customer invoice is created Quasar uses the retail accounting method to calculate the cost of goods sold based on the target margin of an open department item.
Toggle on or off. Toggle off if the item may not be discounted at the point-of-sale. If the discountable flag is turned on, it still can be overridden in the price record where you can make specific prices non-discountable.
Toggle on or off. Toggle on if the item is discontinued and will no longer be purchased. Discontinued items cannot be added to purchase orders or vendor invoices.
Defines the rate at which loyalty points are assigned to customers. If "1" is entered then there is one point assigned for every dollar of purchases by a customer. If "2" is entered then there is two loyalty points assigned for every dollar of purchases by a customer...etc... While this defaults from the subdepartment it can be edited by item.
Toggle on or off. Toggle on if the item can be used for stock sent to you on consignment. When you receive stock on consignment from a vendor you generally do not have to pay for it until it is sold. In most cases you can return the consignment stock to the vendor if it does not sell by a specified date. However, in some cases you are required to purchase consignment stock at the end of a specified date.
Toggle on or off. Toggle on if the item can be used for stock you are sending out to a customer on consignment. When you send stock out on consignment to a customer generally your customer not have to pay for it until they sell it. In most cases they can return the stock to you if it does not sell by a specified date. However, in some cases they must purchase the stock from you after a specified date even if they have not sold it.
Toggle on or off. Toggle on if the item requires serial number tracking. Quasar provides the ability to define (a) if additional information is mandatory at the time of purchasing, (b) if additional information is mandatory at the time of selling or (c) if additional information may be entered optionally. Whether the extra information is mandatory or optional it is defined by clicking on the "Extra Info" tab. Note! If you do not have the serial number toggle turned on you cannot enter data in the extra info section.
Toggle on or off. Toggle on if the item is a gift card and will be linked to the gift card tender. Setting the gift card toggle on will automatically set the "Track Serial" toggle to on.
Defines the single or multiple size names, quantities and shipping weights for the item.
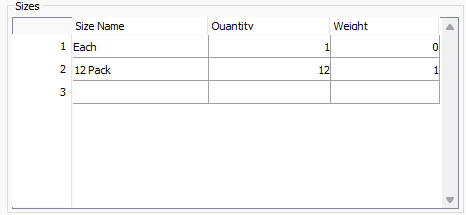
The name for the size you are defining.
The quantity of units in the size.
The shipping weight for the size.
Defines the numbers that can be used to buy or sell the item.
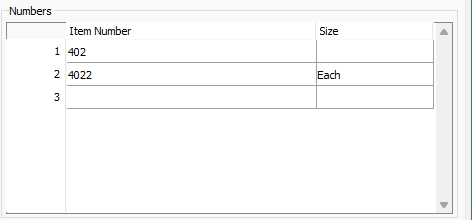
The number that can be used to buy or sell the item. UPC codes are numbers commonly entered here.
- If the number refers to a specific size then link the number to a size. If the size is left blank Quasar will use the default sell size when selling the item and will use the default purchase size when purchasing the item.
Define other miscellaneous information about the item.

This is the default selling size. This will be used primarily by the reporting module as most reports are displayed by selling size.
This is the default purchase size for the item.
Select shelf, item or none.
If a customer group is entered then only the customers belonging to that group can purchase the item. It is to be used for items purchased especially for certain customers.
In development.
In development.
In development.
In development.
In development.
In development.
Toggle on or off. Toggle on if the cashier must enter the quantity of the item when selling it at the point-of-sale.
Toggle on or off. Toggle on if you allow this item to be sold in decimal quantities.
Toggle on or off. Toggle on if you require the point-of-sale to calculate the quantity of items sold from the total price of the item. For example, when selling fuel, you may enter $20.00 and have Quasar calculate the liters or gallons sold for you.
Used in conjuntion with the qty level 1, qty level 2, qty level 3 and qty level 4 attributes for quantity level pricing purposes. Toggle on or off. If you toggle on, then when your customer reaches the quantity levels specified for the item then the entire quantity of the item purchassed on a customer invoice will receive the quantity level pricing. If you toggle off, then only the item quantities greater than the level will recieve the quantity level pricing.
Enter the level 1 quantity for a price break which will occur if the customer purchases a minimum of the specified quantity. Whether all of the items purchased receive the special pricing or whether only the quantity greater then the level recieve the special price will depend on the "Qty Level On All" flag.
Enter the level 2 quantity for a price break which will occur if the customer purchases a minimum of the specified quantity. Whether all of the items purchased receive the special pricing or whether only the quantity greater then the level recieve the special price will depend on the "Qty Level On All" flag.
Enter the level 3 quantity for a price break which will occur if the customer purchases a minimum of the specified quantity. Whether all of the items purchased receive the special pricing or whether only the quantity greater then the level recieve the special price will depend on the "Qty Level On All" flag.
Enter the level 4 quantity for a price break which will occur if the customer purchases a minimum of the specified quantity. Whether all of the items purchased receive the special pricing or whether only the quantity greater then the level recieve the special price will depend on the "Qty Level On All" flag.
The stocking section is used to define the stores the item will be stocked in along with other store specific information such as min/max quantities and multiples.
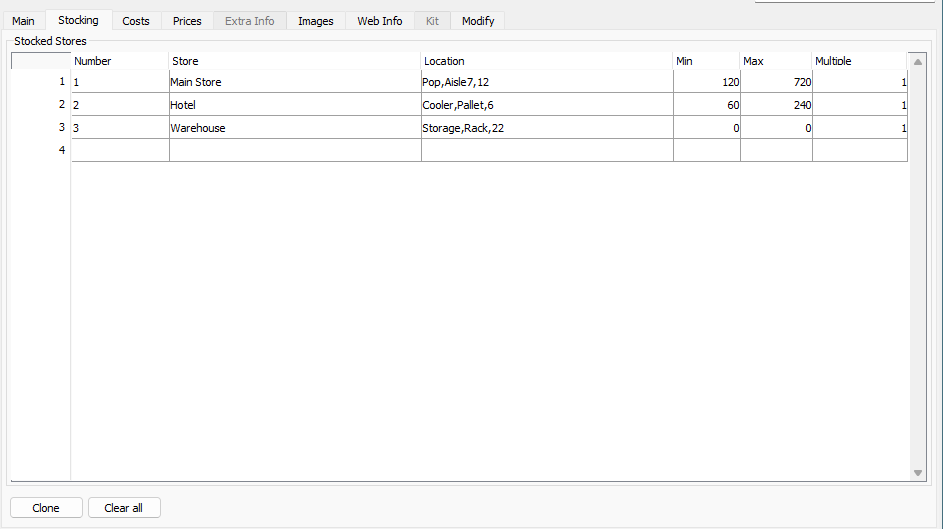
The number of the store. No data can be entered here. Enter the store in the "Store" column and the number will display here.
The name of the store.
The location in the store where the item is displayed.
Defines if the item is purchased, sold or inventoried in the store.
The minimum stock keeping level for the store. This minimum level is used by Quasar's auto order program to create purchase orders. Orders will be generated once the quantity of the item reaches the minimum level.
The maximum stock keeping level for the store. This maximum level is used by Quasar's auto order program to create purchase orders. Orders will be generated to bring the onhand quantities up to the maximum.
Even though a default multiple is specified by the cost record, by store, you can define a multiple higher than the default that was specified in the cost record. By the term multiple, we mean a multiple of the purchase size. For example, specified in the cost from a vendor you may be able to purchase items in a case of 12. However, for freight reasons at a specific store you may wish to alway purchase a full pallet which, for this example, we will assume is 10 cases. Therefore, the multiple would be set to "10". With a multiple of 10 you could order 10 cases , 20 cases, 30 cases, etc.. The Quasar auto order program will use this information when electronically generating purchase orders.
Defines the cost records for the item.
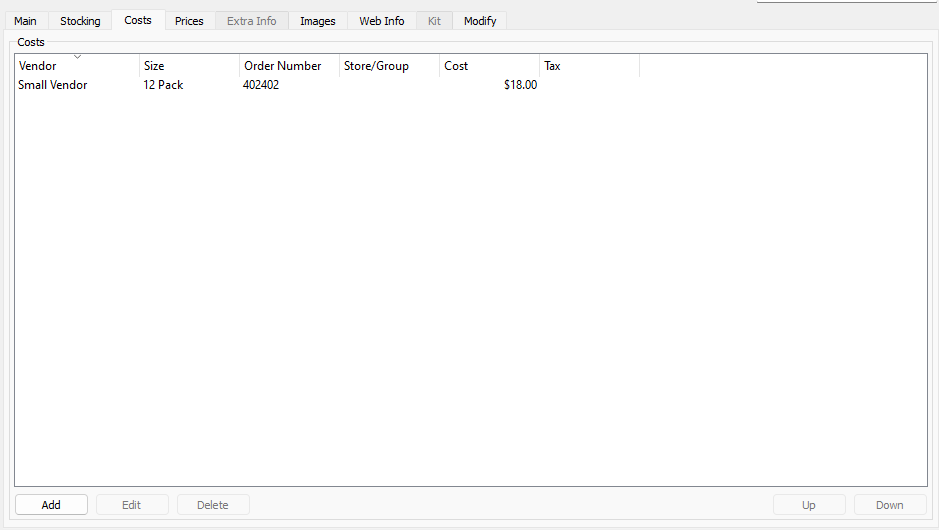
Click on add to add a new cost record.
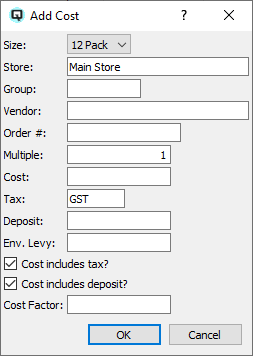
The size associated to the cost record.
The store that will use this cost record. You can leave blank and set the cost record to a store group or you can leave both the store and the store group blank in which case the cost will be valid for all stores.
The group of stores that will use this cost record. You can leave blank and set the cost record to an individual store or you can leave both blank in which case the cost will be valid for all stores.
The vendor for this cost record. If a vendor is added, then only that vendor can use the cost record in an order or vendor invoice. If left blank, then any vendor can use the cost record.
The vendor order number.
By multiple, we mean a multiple of the purchase size. If the item must be ordered in specific multiples or quantities enter the multiple here. When an auto order is generated Quasar will take the multiple into consideration. For example, an item comes 12 to a case and your vendor requires that you order in cases. Also the supplier may require that you purchase 10 cases at a time. Therefore, the multiple is "10". With a multiple of 10 you could order 10 cases, 20 cases, 30 cases, etc...
Defines the taxes for the item when it is purchased.
Defines the total amount or the container deposit for the size.
Defines the total amount of the environmental levy for the size.
Toggle on or off. Toggle on if the cost includes the tax.
Toggle on or off. Toggle on if the cost includes the container deposit.
The cost factor is taken into consideration when calculating the margin and price of an item. By default a positive cost factor is considered as percentage discount. For example, if the supplier always give you 10% off then you would enter a positive 10 as the cost factor. NOTE - the cost factor is not used by the purchase order or vendor invoice.
Click on edit to edit an existing cost record.
Click on delete to delete an existing cost record.
Defines the price records for the item. Quasar has very flexible prices and provides the ability for you define regular prices for each zone, 4 quantity levels for each zone and 4 customer levels for each zone.
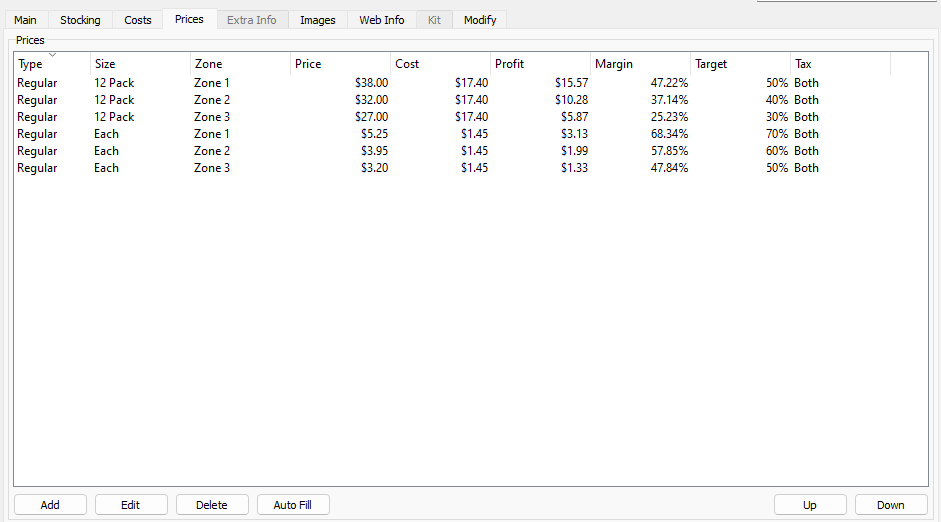
Click on add to add a new price record. All prices are defined by price zone.
The regular price for the item.
The price for customers that get customer level 1 pricing.
The price for customers that get customer level 2 pricing.
The price for customers that get customer level 3 pricing.
The price for customers that get customer level 4 pricing.
The price that will be received when the quantity levels defined for level 1 are achieved.
The price that will be received when the quantity levels defined for level 2 are achieved.
The price that will be received when the quantity levels defined for level 3 are achieved.
The price that will be received when the quantity levels defined for level 4 are achieved.
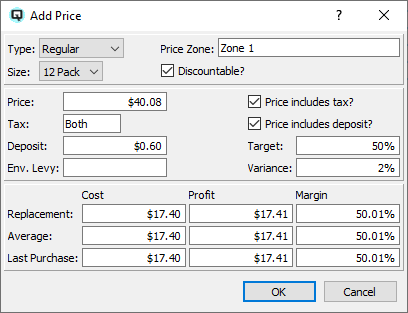
The size the price record is defined for.
The price zone for the price record. Only stores linked to this zone will be able to use the price record.
Toggle on or off. Toggle on if the price can be further discounted at the point of sale. NOTE - This will not override the main discountable flag, in the main folder of the item master, if it is turned off.
The price of the item.
The tax code for the item.
The container deposit collected when the item is sold.
The target margin for the item.
The environmental levy collected when the item is sold.
Defines if the price of the item includes the tax(s).
Defines if the price of the item includes the deposit.
The allowed variance between the target margin and the actual margin for the item.
Shows the replacement cost from the vendor.
The profit on the item if calculated from the replacement cost.
The margin on the item if calculated from the replacement cost.
The average landed cost of the items you now have in stock.
The profit on the item if calculated from the average landed cost.
The margin on the item if calculated from the average landed cost.
The cost of the item the last time it was purchased.
The profit on the item if calculated from the last time the item was purchased.
The margin on the item if calculated from the last time the item was purchased.
Click on edit to edit an existing price record.
Click on delete to delete an existing price record.
Click on auto fill to auto generate a price record for each zone.
This folder is available for use only if the item requires serial number tracking and the serial number toggle has been turned on in the main folder. The extra info folder is used to define additional information that is mandatory or optional for each specific serial numbered item.
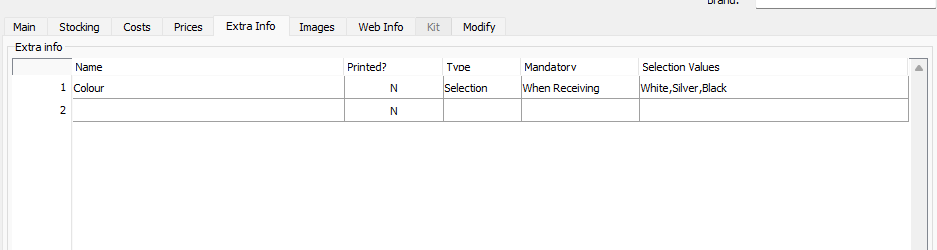
The name of the extra info.
- Defines if you wish the extra info to print on the hard copy of the various documents. The serial numbers print on the documents by default and if you select "Y" the extra info will print under each serial number.
Specify the type of data entry. You can select from the combo box:
If data entry will be by selection the user will be provided a combo box from which they must select from one of the data values that is entered in the "Selection Values".
If data entry will be done using text then the user can enter any alpha-numeric characters.
If data entry will be done using numeric then the user can enter any numeric characters.
Data entry may or may not be mandatory. You can select from the combo box.
Select "No" if the data is not mandatory.
Select "When Receiving" if the data is mandatory at time of receiving.
Select "When Selling" if the data is mandatory at the time of selling.
- Only required if the type is "Selection". Enter the possible values which will be displayed in the combo box for the user. Separate each possible selection by a comma. For example, if the user could select white, silver or black then enter the following as the selection value "White,Silver,Black"
In the images folder you can store images for the item.
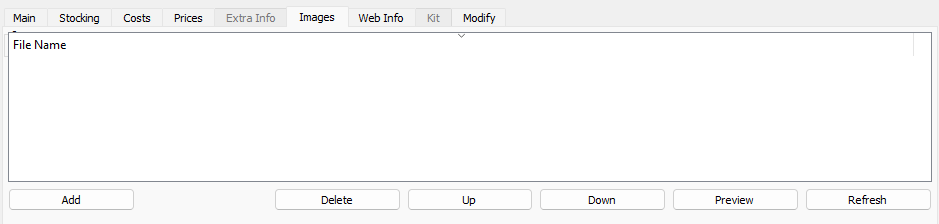
Click on the "Add image" button to add an image link to the item.
Click on the "Remove all" button to remove all images.
By clicking on an image and using the right click of your mouse you can display the full size image.
By clicking on an image and using the right click of your mouse you can set an item as the default item.
By clicking on an image and using the right click of your mouse you can remove an image link.
The kit folder provides the mechanism to define a kit. A kit
is an item created from other items. For example, you may use several
items(components) to build a bicycle. Once you have defined a kit you can build them using the "Build" button.

The build quantity defines the number of kits that can be built with the items listed in the table. For example, if you could build two widget kits with the items(components) listed in the table, then the build quantity would be "2".
Quasar calculates the total cost of all items entered in your build list.
The build table is used to define:
- The components(items) in a kit or kits.
- The description of each component in the kit.
- The size of the component.
- The number of each component in the kit(s)
- The total cost of items in the line.
The modify tab provides a mechanism to modify an item at the point-of-sale by adding additional items. (This is in development)

If you find it is required to record more information about each item then Quasar has provisions for in our default attributes you can create your own extra data attributes. To create and view extra data click on "File" at the top of the item master screen. Follow by clicking on "Extra Data".
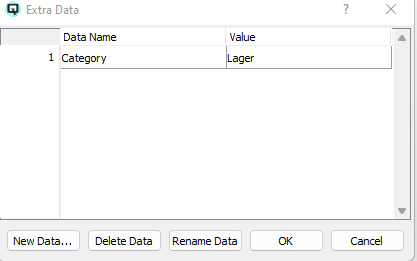
The name of the extra data attribute.
- The value stored for the extra data.
Click on the create data button to create a new data field. Note - Extra data fields once created show in every inventory item.
Click on the delete data button to delete an extra data attribute. CAUTION: When you delete and extra data field it is deleted from all items and values are lost.
Click on the rename data button to rename the data attribute without losing the values.
Quasar provides the capability to link items together through the use of user defined item groups. Groups can be used in many areas including reporting and viewing items.
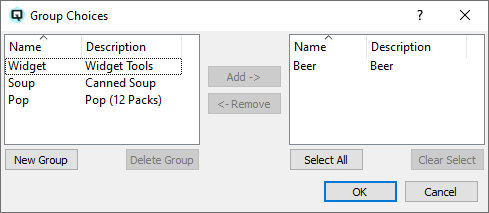
To create a new group or link an item to an existing group click on "File" in the top of the inventory master screen. Follow by clicking on "Groups". The group choices screen will be displayed. In the group choices screen you can create new item groups, view the existing item groups and add the item to a group or remove the item from a group.
Click on the view serials button to view the serial list for the item. The serial list displays the in stock status for each serial, the transaction that each serial came in on and the transaction that each serial went out on. The extra info for a serial number is displayed at the bottom of the view serial screen.
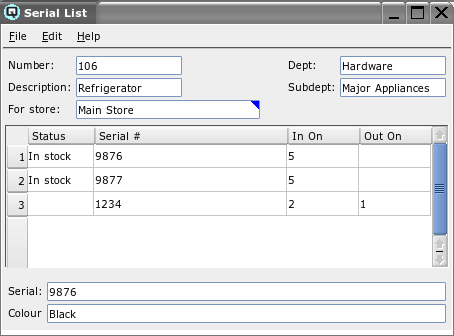
The item number for the serial item.
The description of the serial item.
The store to view the serial item list.
The department the item is linked to.
The sub-department that the item is linked to.
The current status of the serial item. Only display "In Stock" it the item is currently in item.
The serial number for the serial item.
The transaction that the serial item was brought in on.
the transaction that the serial item was sent out on.
Extra info displays, when applicable, at the bottom of serial list. Extra info can be viewed by serial item by clicking on the specific serial line.
Click on the "Stock Status" button to display the stock status for the item.
Click on the "Sales History" button to display the sales history screen for the item.
Click on the "Build" button to build one or more kits. Specify the component multiples. For example if the components listed in the build table created 3 kits, building 3 multiples of the components will create 9 kits. The build process creates an item adjustment which reduces the inventory of the components and increases the inventory of the kit.
Toggle on or off. Toggle on to set the item to inactive. Inactive items may not be purchased or sold. Items with an on order or on hand quantity may not be set to inactive. Toggle off to re-set the item to active.