Employee Master | DocumentationTable of Contents |
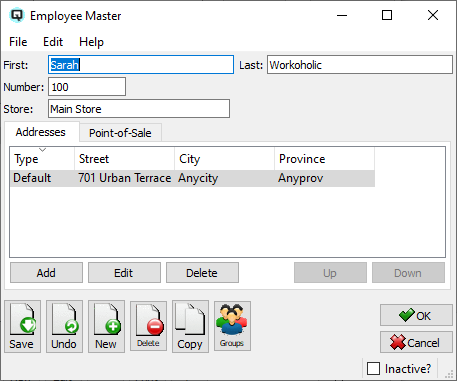
The employee master window is used to define or edit information about your employees.
The employee's given name.
The employee's surname.
Enter a number that can be used to identify an employee. Note that an employee number is required for a cashier to log into the Quasar Point-of-Sale.
The store where the employee works.

Add a new employee address. When you click on the add button the "Add Address" screen will be displayed.
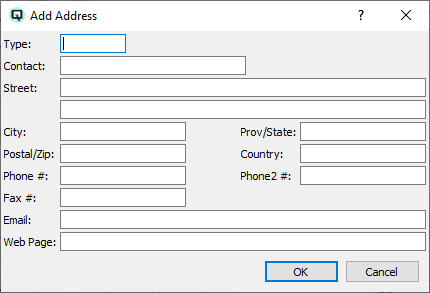
The type of address.
Enter contact name.
The street address of the employee.
The city in which the employee resides.
The province/state in which the employee resides.
The employee's postal/zip code.
The country in which the employee resides.
The employee's primary phone number.
The employee's alternate phone number.
The employee's fax number.
The employee's email address.
The employee's Internet URL address.
Edit an existing employee address.
Delete an existing employee address.

Enter information specific to the employee acting as a cashier at a Quasar point-of-sale.
Select the security level that the employee will have at the point-of-sale.
Select "No Access" if the employee will not have access to the point-of-sale.
Select "Cashier" if the employee will have cashier level security at the point-of-sale. This is the lowest level of security access.
Select "Manager" if the employee will have manager level security at the point-of-sale. This is the second level of security access.
Select "Supervisor" if the employee will have supervisor level security at the point-of-sale. This is the highest level of security access.
- Enter the password that the employee will use when they login as at cashier at the point-of-sale.

Enter the billing items which will be used to charge customers for hourly labour for jobs completed by the employee.
Enter the item that will be used to bill regular hours.
Enter the item that will be used to bill overtime hours.
Enter the item that will be used to bill holiday hours.
Toggle on or off. Toggle on if the employee is no longer active. Toggle off to make the employee active again.