Count Master | DocumentationTable of Contents |
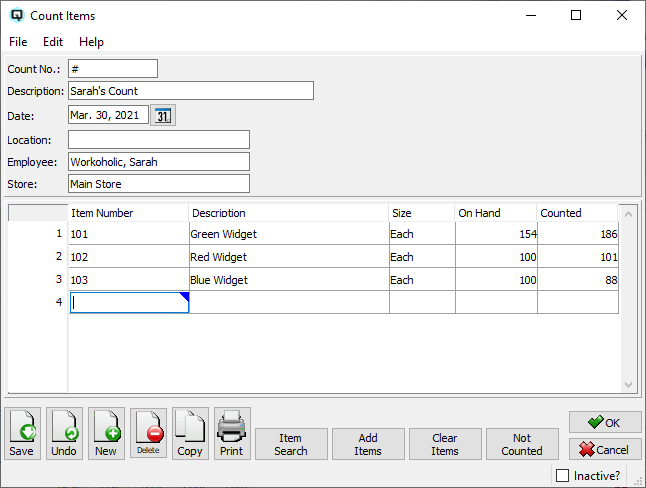
The count master screen is a tool to be used for taking physical inventory of your stock on hands. A physical inventory may be taken as one count, or as multiple counts. The count master, in of itself, does not update the on hand quantities of your stock. The "Process Counts" function is used to consolidate active counts and updates stock on hands by creating an item adjustment transaction.
Quasar displays the next available count number.
The description of your physical count.
The date of the physical count.
The physical location of the stock being counted.
The employee creating the physical count.
The store in which the physical count is being conducted.
Use the stock entry table to enter your item count.
Enter the item number for the item counted.
The description of the item counted.
The size of the item counted.
The systems current on hand quantity of the item prior to processing your new physical count.
Enter your actual count for the item.
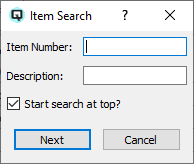
Click on the item search button to search for an item in a large count.
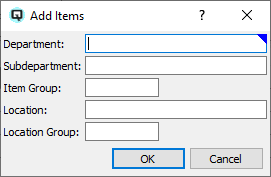
Click on the add items button to add items to the count table. You can add items in a department, subdepartment, item group, location or location group.
Click on the clear items button to clear all of the items in the count.
Click on the not counted button to add not counted items to the count. For example, if you are taking a physical inventory of 20,000 item and you have zero stock of 1500 items you can add them all to the count and set the stock to zero by using this function. You can add not counted items in a department, subdepartment, item group, location or location group.
Toggle on or off. Toggle on to set the count to inactive. Only active counts may be processed.