Vendor Cheque | DocumentationTable of Contents |
While this screen is called the "Vendor Cheque" screen when called from the "Vendor Payment" button, the same screen is also used to create a customer cheque or even a quick cheque. The term cheque is a very loose term because while you can generate hand-written cheques and system generated cheques, you can also use the screen to make online credit/debit card payments.
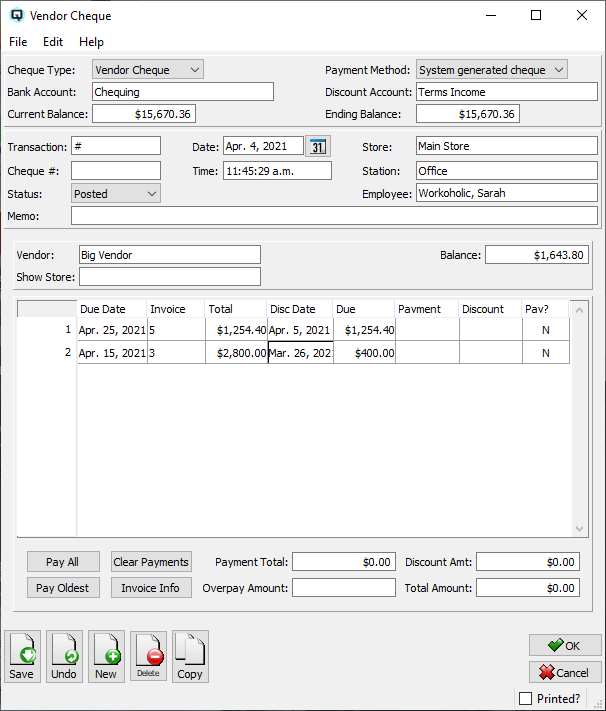
Utilize this screen to pay the bills owed to an individual vendor or to pay a deposit to a vendor. Following is a description of the attributes within the vendor payment screen:
Defaults to Vendor Cheque. Select the cheque type:
Select "Quick Cheque" if you wish to make a miscellaneous payment for goods and services. Quick Cheques do not impact payables or receivable details.
Select "Vendor Cheque" to make a vendor payment.
Select "Customer Cheque" to generate a cheque that directly impacts a customer account.
A vendor cheque may be created using one of three methods.
Select "hand-written cheque" if the cheque was hand written and a system generated cheque is not required.
Select "system generated cheque" to print the cheque through Quasar's print cheques screen.
Select "credit/debit card or online" to miscellaneous bills without recording a cheque number.
The ledger bank account from which the funds for the payment will be drawn.
Enter the account id for the reduction of payables due to terms discounts. For example, if a payable is debited by $5.00 as a result of a terms discount, the off-setting entry will be a credit to a discount account.
The current balance of the bank account from which the payment is being made.
The ending balance of the bank account after the current payment is considered.
The transaction id number is incremented by Quasar. This may be changed by the user. If the id number entered is the same as an existing id then a warning message will be displayed.
The cheque number for the vendor cheque. Quasar automatically assigns the next cheque number for cheques that are printed manually. The next cheque number for any account is stored in the ledger account master screen. For online payments enter the reference number. For system generated cheques the number is not assigned until the cheque is printed.
The date for the payment. The date determines the accounting period in which the payment will be posted.
The time that the payment is created.
Enter the store that the payment posting will affect.
The station (work station) on which the payment is created.
The employee creating the payment.
The default status. Set to "Posted" to post the transaction to the general ledger.
Set to "Suspended" if the vendor cheque is not yet posted to the general ledger.
The vendor cheque is voided or inactive.
Defines the purpose of the payment.
The name of the vendor to whom the payment is being made.
The current balance owed to the vendor.
Select a store to view. If you select a store to view only payments due for a specific store will be displayed.
The payment table displays all of the vendor invoices that have remaining balances due. The unpaid receivings are displayed in ascending order from the oldest to the newest.
The date that the vendor invoice is due.
The transaction id of the invoice.
The total amount of the invoice.
The date by which the invoice must be paid in order to receive the early payment discount offered within the vendor terms.
The net amount due on the invoice.
The payment amount being allocated to the vendor invoice.
The amount of the early payment (terms) discount taken.
Toggle on to pay. Toggle off to remove the invoice from the invoice list.
Click on the "Pay All" button to pay all bills owed to the vendor.
Click on the "Pay Oldest" button to pay an amount and allocate it to the oldest invoices.
Click on the "Clear Payments" button to clear all allocated payments to the vendor.
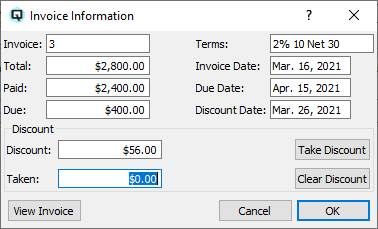
Click on the invoice info button to view specific information about an invoice. The "Invoice Information" window will be displayed. The invoice information displayed is dependant on the line in payment table where the cursor rests. If you move the cursor to a new line in the payment table the information in the "Invoice Information" screen will change accordingly.
The transaction id of the invoices.
The total of the invoice.
The total paid on the invoice.
The unpaid balance of the invoice.
The discount terms for the invoice.
The date of the invoice.
The date that the invoice payment is due.
The date that the invoice must be paid if you wish to take the early payment terms.
The amount of the terms discount calculated from the terms.
Click on the "Take Discount" button to take the early payment discount even though you may have missed the discount due date.
The amount of terms discount taken.
Click on the clear discount button to clear any terms discount taken.
Click on the "View Invoice" button to view the actual vendor invoice.
The total amount of allocated payments.
Enter an amount to pay the vendor apart from what is owed on current vendor invoices. For example, to pay a deposit to a vendor you would enter the amount to overpay.
The total amount of terms discounts taken as a result of early payment.
The total of both allocated and non-allocated payments.