Quick Cheque | DocumentationTable of Contents |
While this screen is called the "Quick Cheque" screen when called from the "Write Cheque" button, the same screen is also used to create a vendor cheque or even a customer cheque. The term cheque is a very loose term because while you can generate hand-written cheques and system generated cheques, you can also use the screen to make online credit/debit card payments.
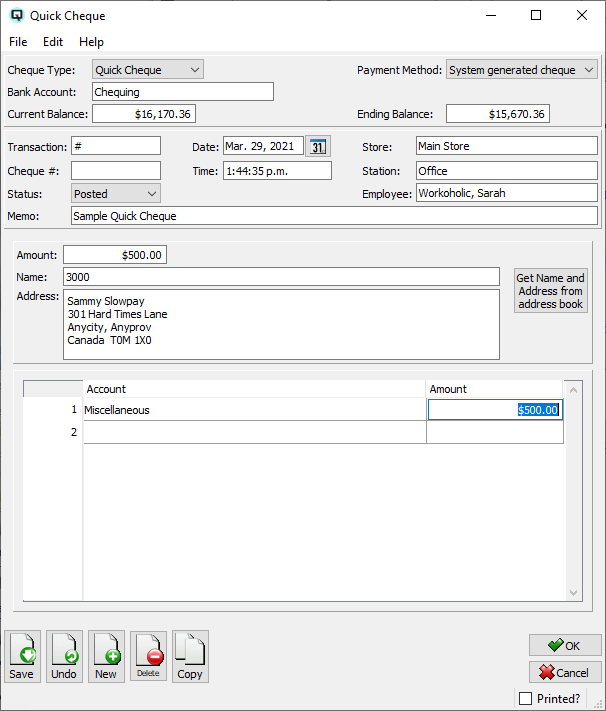
Defaults to Quick Cheque. Select the cheque type:
Select "Quick Cheque" if you wish to make a miscellaneous payment for goods and services. Quick Cheques do not impact payables or receivable details.
Select "Vendor Cheque" to make a vendor payment.
Select "Customer Cheque" to generate a cheque that directly impacts a customer account.
Select the method of payment:
Select "hand-written cheque" if the cheque was hand written and a system generated cheque is not required.
Select "system generated cheque" to print the cheque through Quasar's print cheques screen.
Select "credit/debit card or online" to miscellaneous bills without recording a cheque number.
The bank account upon which the cheque transaction will be drawn.
The current balance of the bank account.
The bank account balance after the quick cheque is posted.
Quasar automatically assigns a transaction number in sequence for each quick cheque transaction. If required you can enter a number manually.
The cheque number for the quick cheque. Quasar automatically assigns the next cheque number for cheques. The next cheque number for any account is stored in the ledger account master screen.
The default status. Set to "Posted" to post the transaction to the general ledger.
Set to "Suspended" if the quick cheque is not yet posted to the general ledger.
The quick cheque is voided or inactive.
The date for the cheque. The date determines the accounting period in which the cheque will be posted.
The time that the cheque is created.
The store that the cheque posting will affect.
The station (work station) on which the cheque is created.
The employee creating the cheque.
Defines the purpose of the quick cheque.
The total amount of the quick cheque.
The name for the recipient of the quick cheque. Note Quasar can fill in the name of the recipient from one of the cards you have defined. Using a customer or vendor do this will not effect the balance of the customer or vendor. To effect the balance, use the specific customer cheque or pay vendor screen.
The address of the recipient of the quick cheque. Quasar can fill in the Payee name and address from any card you've defined by using the "Get Name and Address from address book" button. Note that when creating a quick cheque using a customer or vendor to do this will not effect the balance of the customer or vendor. To effect the balance you will need to change the cheque type.
The name of an account to which the cheque will be posted. The amount of the posting must be entered in either the amount column but not both. Multiple accounts can be listed.
The amount to be posted to each account. The total amounts for all accounts must equal the total amount of the cheque.